Big day today! Lots of great successes!
First off, Gio had another obedience trial. He did wonderful, but blew his long sit. If he would have kept his sit, it would have been another 192.5. But with his bum leg, I really can't complain. He did everything else really well, but just couldn't pull off the sit. He did stay in place though, just stood. So I still count that as a success.
Rally-O was a really exciting time! Gio was entered in two Novice A rounds. He took High in Class in BOTH with a score of 95 in the first round and a perfect score of 100 in the second round! Romeo was entered in two Novice B rounds. The first round he was a bit of a brain-fart, and barely qualified with a 75. The second round he found his brain and pulled off a perfect score of 100! One other dog scored 100, so it came down to times. Romeo was 15 seconds slower than the other dog, so took 2nd place. But certainly can't complain about the perfect score!
I'm so proud of my boys! They did fantastic ... I couldn't be happier! This is me beaming!
Tomorrow Gio has another obedience trial and both Romeo and Gio have two more Rally-O trials.
Sunday, August 31, 2008
Saturday, August 30, 2008
SKOC Trial -- Day 1
Day 1 is over!
Gio was entered in one obedience trial this morning, Novice A. He did fabulous! Qualified with a score of 192.5, placing him 2nd in class (the dog that beat him got 193.5, I believe). But he was high Sheltie in class, so got a nice big ribbon and a monetary prize that covered his entry fees for the day. Not too shabby for his first time in the obedience ring!
We got to meet Bosley and Maggie (and Kim, of course), and watch Bosley in obedience. He was in the same class as Gio and took High in Class. Good job, guys! Because it was a Bernese Mountain Dog booster, they walked away with a lot of cool prizes. Congrats!
After our run through the obedience ring, we manned the St. John Ambulance therapy dog booth for a couple of hours.

Gio worked really hard ...

Romeo wasn't entered in anything so got to stay home and relax until tomorrow. Off tomorrow for another obedience trial and a couple of rally-o trials.
Friday, August 29, 2008
Novice Obedience Fun Match
The crazy weekend has officially begun! There was an obedience fun match held at the venue this evening, so I took the boys over to get them acquainted with the building. I put them both in Novice Obedience, even though Gio is the only one entered in obedience this weekend. Romeo already has his CD, but the Rally trials are being held in the same ring so I wanted to take this opportunity to introduce him to the ring. He occasionally gets ring nerves and ends up lagging, so I treated this novice run as if it were rally-o and made sure that he had a good time.
Gio, on the other hand, IS entered in obedience this weekend (as well as rally-o), so we treated this as if it were legit. He did awesome! Wound up with a score of 195 ... I couldn't be more proud! Here is a video of Gio's Novice fun match run. (Please ignore the view of the handler ... all focus on the dog, please!)
Big "Thank You" to Liz for manning the camera for me!
Braid Flower
I came across a blog a couple of days ago where the woman made a comment in regards to my blog..."she probably thinks that she thought of these hairstyles herself."
So let me set the record straight on that. I don't think I thought of these myself. I watched my mom do my little sisters hair. She had AMAZING ringlets that her sweet daughter inherited. I had stick-straight hair and very little of it so I was always coveting those curls. I watched her braid it, fish-tail it, etc. I started doing little girls hair when I was about 9 years old and I started babysitting for a hairdresser. I was able to do her three daughters hair. She taught me a lot. I learned from her. I learn from watching movies, especially teeny-bopper shows. I see hairstyles in parks and libraries and my daughters schools and I emulate them. I learn from friends, neighbors and family members. Some times I will think I have thought of something myself and I see it being done already. It is hair. Saying I thought of it first is like saying there is only one great chocolate chip cookie recipe. It just isn't possible.
So today, I will show you one that I used from another blog. First I saw THIS post by Jenn, who has become a wonderful friend, and I loved how she did the loops. Then I saw THIS post and loved the braids. So I combined the all up into a ponytail and then did the braid flower. See...not original. But it fulfills the purpose of this blog...and what I assume is the purpose for all of the other hair blogs that are surfacing...to share ideas.


Basic Instructions:
Pull the hair into a tight ponytail
Using pomade, braid the hair into five equal sized braids...make sure to end the braids the same distance down
Pull the braid into a loop and push the ends of the braid through the elastic...as shown HERE
Repeat with each of the braids.
When I had them pulled through, I used my flat iron and curled the ends and then I used a pliable putty (by Garnier of course) and pieced them out.
Thursday, August 28, 2008
Wordless ... err ... Thursday?
Sorry folks, nothing interesting today. So I'll just share one of my favorite pictures of the boys!


Fire.
Today I managed to squeeze into some shorts I bought a few months ago, and haven't been able to wear until now. Naturally I was very happy about that since I really like these shorts... they have such a great cut, and have a great fire red colour.

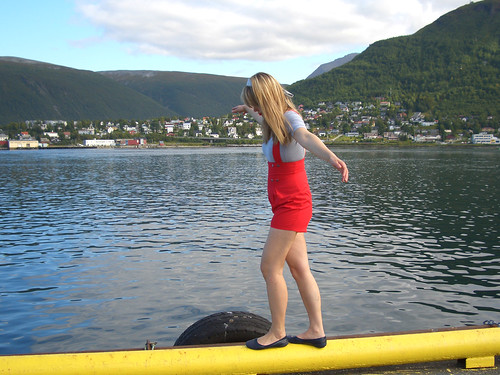
Vintage high waisted shorts from ebay, leotard from American Apparel, and shoes from Dinsko.
Vintage high waisted shorts from ebay, leotard from American Apparel, and shoes from Dinsko.
Wednesday, August 27, 2008
Outdoor Obedience Practice
One of the trials this weekend is being held outdoors. Last summer, most of my training was outdoors. But plans were a bit different this year so we have been doing most of our training at an indoor facility. So in preparation for the many and varied outdoor distractions, I took the boys over to a nearby parking lot to work on some outdoor obedience practice. A school field backs onto this parking lot, so I thought it would be a good place to hone our skills.
Starting with some long sits and downs (see the school play ground full of children in the background?). In case you are wondering, I do normally train stays with the leashes off. But with all the kids around and it being an active (though empty at the moment) parking lot, I didn't want to take any chances, so left the leashes on this time around.


As I was standing silently, mentally willing the boys to keep their sits, I glanced down at the ground and lo and behold ... a PENNY! A very tarnished, but potentially lucky penny! It's a sign ... I'll have to remember to stick this in my pocket before the trials this weekend!

Next was some heel work. And as we were heeling along, I began to think to myself that I see an awful lot of the boys from an upside down viewpoint! Granted, I think I have a better view than they do!


After a job well done, the boys earned themselves a quick romp in the soccer field!
They ran out ...

They ran in ...

And they ran round and round and round!

Tuesday, August 26, 2008
Trimming Sheltie Ears
Here is yet another "How To" for Sheltie grooming. Or rather than calling it a "How To" and implying that it is the only way to groom a Sheltie, let's call it a "How I Do It". I realize there may be different ways to trim these hairy beasties, but these are the methods that I use.
The ears are tricky to get right, and take quite a bit of practice. The first couple of times I tried to tackle Romeo's ears, I ended up eye-balling them for days afterwards, attacking them with the thinning shears a couple more times to even things out, balance them, and smooth out corners that I never intended to put there in the first place. As such, I always like to trim the ears a couple of days before they need to be looking their best. For example, both boys are entered in a big obedience and rally-o trial this coming weekend. I planned to do the ears tonight, so that I have the next couple of days to tidy them up a bit before they need to be on display in the trial rings.
Another note, this trimming technique gets best results on tipped ears. Some Shelties, my Gio included, have prick ears that stand straight up. I tried this method on him once and it just didn't look right. I find that on Shelties with pricked ears, the fly-away scruffy look tends to look better. If you start trimming and trying to tidy things up, then it just emphasizes the size of their ears. So I only trim Romeo's ears as they are tipped very nicely.
For this task, you will need:

- a pair of thinning shears (you can purchase professional groomer thinning shears for upwards of $100, or you can pick up a pair from your favorite drug store for about $15)
- a fine toothed metal comb
- a small pair of blunt nosed scissors
Step 1
- Comb through the hair on the back of the ear completely to remove any snaggles or mats. Once the hair is smooth, place the teeth of the comb at the base of the ear and comb straight upwards towards the tip of the ear, holding the hair to the back of the ear with your finger. It may take a few swipes to get all the hair from the back of the ear gathered. Be sure to only gather the hair that is attached to the ear itself, don't take hair from the back of the dog's head or neck.
 Step 2
- Using the shape of the ear as a guide, use the thinning shears to trim the hair that sticks outside of the shape of the ear. It is a good idea to do this in a couple of steps. Trim a bit, then comb the hair back up from the base of the ear again so that you do not miss any. Start trimming on the outside edge of the ear, and then on the inside edge. In the picture to the left, I am still holding all of the combed hair to the back of the ear, but all the hair that protrudes outside of the shape of the ear has been trimmed off.
Step 3
- Hold the edge of the ear between your thumb and forefinger so that you can feel the edge of the ear under your fingertips. With the blunt nosed scissors, CAREFULLY trim around the edge of the ear in a smooth curve that follows the top edge of the ear.
Step 4
- Repeat steps 1-3 with the other ear. Then take a step back and look at both ears. Compare to see if they are the same shape and evenly weighted by encouraging your dog to prick his ears up (time to make funny noises!). Trim with the thinning shears as needed. I prefer to leave the hair in the front of the ear intact, though if there are any great long fly-aways, I will trim them a little bit shorter so that they stay within the overall shape of the ear.


Other entries that I have written on how I groom my Shelties:
Grooming those Sheltie feet
Trimming Sheltie leg feathers and hocks
Trimming Sheltie ears
Homemade snood to prevent messy, broken hair
The ears are tricky to get right, and take quite a bit of practice. The first couple of times I tried to tackle Romeo's ears, I ended up eye-balling them for days afterwards, attacking them with the thinning shears a couple more times to even things out, balance them, and smooth out corners that I never intended to put there in the first place. As such, I always like to trim the ears a couple of days before they need to be looking their best. For example, both boys are entered in a big obedience and rally-o trial this coming weekend. I planned to do the ears tonight, so that I have the next couple of days to tidy them up a bit before they need to be on display in the trial rings.
Another note, this trimming technique gets best results on tipped ears. Some Shelties, my Gio included, have prick ears that stand straight up. I tried this method on him once and it just didn't look right. I find that on Shelties with pricked ears, the fly-away scruffy look tends to look better. If you start trimming and trying to tidy things up, then it just emphasizes the size of their ears. So I only trim Romeo's ears as they are tipped very nicely.
For this task, you will need:

- a pair of thinning shears (you can purchase professional groomer thinning shears for upwards of $100, or you can pick up a pair from your favorite drug store for about $15)
- a fine toothed metal comb
- a small pair of blunt nosed scissors
Step 1

- Comb through the hair on the back of the ear completely to remove any snaggles or mats. Once the hair is smooth, place the teeth of the comb at the base of the ear and comb straight upwards towards the tip of the ear, holding the hair to the back of the ear with your finger. It may take a few swipes to get all the hair from the back of the ear gathered. Be sure to only gather the hair that is attached to the ear itself, don't take hair from the back of the dog's head or neck.
 Step 2
- Using the shape of the ear as a guide, use the thinning shears to trim the hair that sticks outside of the shape of the ear. It is a good idea to do this in a couple of steps. Trim a bit, then comb the hair back up from the base of the ear again so that you do not miss any. Start trimming on the outside edge of the ear, and then on the inside edge. In the picture to the left, I am still holding all of the combed hair to the back of the ear, but all the hair that protrudes outside of the shape of the ear has been trimmed off.
Step 3

- Hold the edge of the ear between your thumb and forefinger so that you can feel the edge of the ear under your fingertips. With the blunt nosed scissors, CAREFULLY trim around the edge of the ear in a smooth curve that follows the top edge of the ear.
Step 4
- Repeat steps 1-3 with the other ear. Then take a step back and look at both ears. Compare to see if they are the same shape and evenly weighted by encouraging your dog to prick his ears up (time to make funny noises!). Trim with the thinning shears as needed. I prefer to leave the hair in the front of the ear intact, though if there are any great long fly-aways, I will trim them a little bit shorter so that they stay within the overall shape of the ear.


Other entries that I have written on how I groom my Shelties:
Grooming those Sheltie feet
Trimming Sheltie leg feathers and hocks
Trimming Sheltie ears
Homemade snood to prevent messy, broken hair
Trimming Sheltie Leg Feathers and Hocks
As requested, here is a step-by-step guide to how I trim my Shelties' front leg feathers and hocks. The technique for the front legs was taught to me by Romeo's breeder (Thanks Brenda!). The technique for the hocks, I figured out on my own and am happy with the results. (Please excuse the messy feet. "Foot Trimming Day" is on Thursday.)
Again, following my normal pattern, I prefer to keep these things cheap and easy, no fancy equipment if I can avoid it. For the whole process, you will need:
 - a small slicker brush
- a fine toothed metal comb
- a small pair of blunt nosed scissors
- a small battery operated razor with adjustable guide (I prefer to use a woman's personal hygiene razor that you can get at any drug store for around $20).
Front Leg Feathers
Step 1
- With the fine toothed comb, comb through the hair on the back of the front leg, from "elbow" to "wrist", gathering it flat along the leg. Hold it in place with your thumb located just above the dog's "thumb pad" located on the back of their wrist.
 Step 2
- With the blunt nosed scissors, cut the hair that is hanging below the dog's "thumb pad" straight across.
Step 3
- With the scissors or the razor (whichever you are more comfortable with) cut the hair between the dog's "thumb pad" and the large paw pad so that it is as short as the hair on the front of the leg.
 All done! By gathering the hair from the elbow down to the wrist and then cutting it all straight across, you will wind up with a really nice taper from top to bottom. And by using the thumb pad as a guide on both legs, it ensures that you will wind up with an even job on both sides.
Hocks (Back Legs)
Step 1
- With the slicker brush, brush the hair on the back of the hocks UP from the paw to the point of the hock so that all the hair is standing up and away from the leg.

 Step 2
- Set the battery operated razor to the longest setting, approximately 0.5" (just over 1 cm). Moving from paw to the point of the hock, run the razor up the back of the dog's leg using the back of the leg as a guide.
I find that the leg hair (front and back) doesn't grow as quickly as paw hair. So while I trim paw hair once a week, I only do the leg hair every 2 months, or when it starts to look scruffy.
Other entries that I have written on how I groom my Shelties:
Grooming those Sheltie feet
Trimming Sheltie leg feathers and hocks
Trimming Sheltie ears
Homemade snood to prevent messy, broken hair
Again, following my normal pattern, I prefer to keep these things cheap and easy, no fancy equipment if I can avoid it. For the whole process, you will need:
 - a small slicker brush
- a fine toothed metal comb
- a small pair of blunt nosed scissors
- a small battery operated razor with adjustable guide (I prefer to use a woman's personal hygiene razor that you can get at any drug store for around $20).
Front Leg Feathers

Step 1
- With the fine toothed comb, comb through the hair on the back of the front leg, from "elbow" to "wrist", gathering it flat along the leg. Hold it in place with your thumb located just above the dog's "thumb pad" located on the back of their wrist.
 Step 2
- With the blunt nosed scissors, cut the hair that is hanging below the dog's "thumb pad" straight across.
Step 3

- With the scissors or the razor (whichever you are more comfortable with) cut the hair between the dog's "thumb pad" and the large paw pad so that it is as short as the hair on the front of the leg.
 All done! By gathering the hair from the elbow down to the wrist and then cutting it all straight across, you will wind up with a really nice taper from top to bottom. And by using the thumb pad as a guide on both legs, it ensures that you will wind up with an even job on both sides.
Hocks (Back Legs)
Step 1

- With the slicker brush, brush the hair on the back of the hocks UP from the paw to the point of the hock so that all the hair is standing up and away from the leg.

 Step 2
- Set the battery operated razor to the longest setting, approximately 0.5" (just over 1 cm). Moving from paw to the point of the hock, run the razor up the back of the dog's leg using the back of the leg as a guide.
I find that the leg hair (front and back) doesn't grow as quickly as paw hair. So while I trim paw hair once a week, I only do the leg hair every 2 months, or when it starts to look scruffy.
Other entries that I have written on how I groom my Shelties:
Grooming those Sheltie feet
Trimming Sheltie leg feathers and hocks
Trimming Sheltie ears
Homemade snood to prevent messy, broken hair
Monday, August 25, 2008
Change in Menu Plan
Everyone to the bomb shelters! Batten the hatches! Run for cover!
Gio has gas!
Holy stink-much, Batman! Something obviously isn't sitting right with the G-Man. I think it may have been a bit too much beef heart yesterday, or something. But Gio has some crazy death gas today. The menu for this evening was originally the remainder of the beef heart and some chicken backs, but I decided to forgo that option in lieu of some green tripe. Oh, please almighty green tripe! Work your miracles and cease this horrible stench!
Of course, typical male, Gio is quite proud of his flatulence. Even to go so far as to wander over to where you are before letting a particularly ripe one free. Then looking at you as if to say, "Nice one, eh?! Bet you wish you could do that well."
No, Gio, my boy. When I happen to do "that well", I vacate the property with my face hidden in shame.
Beginner Agility - Week 4
Week 4, what a wonderful week! Romeo is really enjoying agility, and it seems that his favorite obstacles (at least lately) are the "tall ones" ... the A-frame and the dog walk. Full body shivers when I tell him to "get ready", then he blazes over the top. Has a nice solid wait for the contacts, too. Still need some proofing, of course, but it's coming along nicely.
This week we also worked on the pause table. He found that pretty boring, but if it earns some treats, why not? The tunnel is always fun, as was the chute once he remembered that he did it last week so didn't need to be afraid to push. (Silly dog ... give me patience!) It took a couple of tries, but he finally had a light bulb moment and remembered that he could just keep running and the fabric would get out of his way. After that brain wave, it was smooth sailing! Was even a bit more solid on the tire. And his off-side weave entries are coming along very nicely.
There are only two more sessions left in this set of classes. Then on to the next level!
Sunday, August 24, 2008
Homemade Dog Training Treats
It's baking day today! Usually once a week or so I do up a batch of training treats to last the boys through their various classes and training sessions. Today I made up two of my (and the boys') favorite recipes. Both are very easy and don't require a lot of fancy ingredients that you have to go to a specialty store for ... two of my primary baking standards!
Fishy Fudge
These ones are soft and stinky, perfect for training!
 Ingredients
- two cans of tuna in water OR one large can of salmon in water
- two eggs
- 1 tsp garlic powder
- 1.5 cups flour
Step 1
- In a blender, combine fish with the canning water, eggs, and garlic. Blend until smooth. You can add the egg shells in the blender as well, great source of calcium! I choose to keep the shells aside and add them to the boy's dinner later on.
 Step 2
- Pour the blender mixture into a mixing bowl. Add 1.5 cups of flour. White flour works well, as does whole wheat flour. I imagine you could use rice flour, oat flour, etc. though I haven't tried it myself. Mix well.
 Step 3
- Press the dough into a greased 9x9 baking dish. Bake at 350F for 20-30 minutes. I like to remove the dish after about 20 minutes and cut into ~1 inch squares. The dough will still be very sticky and wet at this point. Return to the oven and bake for another 10-15 minutes until the desired firmness. If you like them stickier, bake less. Firmer, bake more. After baking, remove from oven, allow to cool and break into pre-cut squares. I prefer to cut them into ~1 inch squares as then I can rip of tiny pieces as needed for training, or use one large piece as a JACKPOT.
Alternative Baking Option
- Spoon the dough into a piping bag (or a plastic bag with the corner cut out). Pipe into long strips on a cookie sheet. Bake at 350F for ~15 minutes, or until done. Allow to cool and snip into smaller sticks with scissors.
Storage
- Fishy Fudge will keep for about a week in a sealed container in the fridge. They can also be frozen and thawed for later use.
Liver Treats
High value rewards for an extra good job!
 Ingredients
- a couple trays of chicken livers. These can be purchased at most grocery stores, usually frozen into trays, for about $1.33/kg (~$0.60/lb). Beef or pork liver works well also, though I would recommend that you cut it into approximately 2" x 2" squares before proceeding.
- garlic powder

Step 1
- Get a large pot of water boiling and toss in the livers and a couple shakes of garlic to your desired potency. If the livers are still slightly frozen, that is fine. Boil until they are cooked all the way through. To test if they are cooked, remove one liver and cut it in half through the middle. If it is brown-gray all the way through with no pink-red areas, then it is cooked. Takes approximately 10 minutes, give or take.

Step 2
- Once they are cooked through, remove from the water and place on a baking sheet in one layer. Place in the oven (convection or traditional) at 250F.

Step 3
- Check after about 20 minutes, and if the livers are dry and slightly browned on top, remove from the oven. Flip the livers over and return to the oven for another 10-15 minutes until they are an even golden brown. You don't want to leave them too long so that they get hard or burn, just long enough to dry them a bit.
These treats will stay soft on the inside, so can easily be broken into training treat sized bits.
Storage
- These freeze very well! I will occasionally make up a couple large batches, portion into plastic zip-top bags and freeze. Remove what is needed from the freezer about an hour before training. Any leftovers will keep in the fridge for about a week.
Remember, always allow the treats to cool completely before storing! That will prevent them from getting soggy in the fridge or frosty in the freezer.

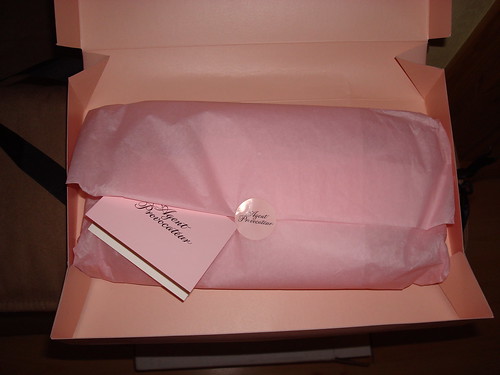
Agent Provocateur.
For years I had wanted to purchase some underwear from Agent Provocatur as their underwear is so pretty, and has a boudoir feeling to it. And also probably because it is Agent Provocateur. Their prices have always put me off though. But then a few weeks ago I noticed that they had a sale with quite reasonable prices, so I went for it. What I bought arrived in such a beautiful wrapping with a little card, too.
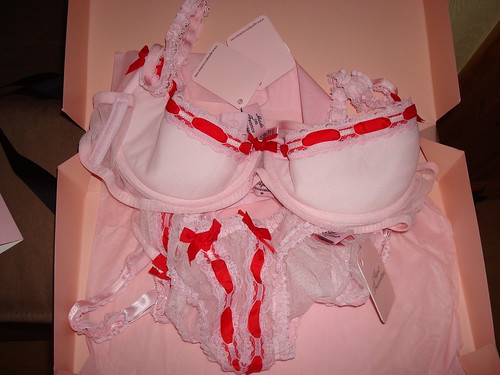
They apparently still have a sale, if anyone's interested. Some items are also down to 70%.
They apparently still have a sale, if anyone's interested. Some items are also down to 70%.
Saturday, August 23, 2008
Bath Time!
The boys get a bath about 3-4 times a year, give or take. Today was one of those times.
With the "big show" coming up next weekend and winter weather quickly approaching (*shudder*), I thought this was as good a time as any. I take them to a locally owned business called Vaganza's that offers a decently priced U-Groom. Take your dogs in and for a small fee you get to use their raised tubs, grooming tables, forced air dryers, and all the shampoo, conditioner, whitener, and towels you want. Top it off with a slick of PetSilk and a cookie and we're homeward bound!
The boys don't like it very much, but I love the convenience of it all. Plus the raised tubs are much easier on the back and I don't have to do any big clean-up afterwards.
Some wet dogs ... scrawny beasts!


And some sudsy puppies!


After a spritz with some leave in conditioner and a good blow out, they are fluffy, soft and shiny!
Zoomies ensue as soon as we get home, up and down the hallway a couple dozen times. Now both are currently curled up on the bed for a nap ... it's a lot of work being handsome!
Friday, August 22, 2008
Friday!
Today was our last opportunity for a drop-in practice before the big trial next weekend. I still have all next week to polish things up a bit, but I don't like to do too much training right before a trial. I took both boys over to Paws 'n Train again and ran through the bits and pieces that they needed to work on for Novice Obedience (for Gio) and Novice CKC Rally-O (Gio and Romeo).
A training friend of mine was there and she put Gio and I through our paces (Thanks Heather!). Gio did wonderfully, and if he does anything like that next weekend, we should be golden! The big issue that we have been working on is the call front. A couple of weeks back, Gio decided that when I called him front, he should lay down in front of me instead of sit. I have no idea where he got that idea from, but it was pretty firmly implanted in his head. So with some repetition and the help of some stinky garlic salami, I think we have it re-affirmed that he should sit, and not down! Everything he did tonight was beautiful, I really have high hopes for next weekend.
Romeo was his normal enthusiastic self. We did a lot of heeling drills tonight. I'm hoping that that will help with his lagging issue. He tends to get nervous in the ring (could be a reflection of me, even though I try to not let it get to me and honestly don't feel that nervous myself). And when he is nervous, he lags. It's never been bad enough that we NQ, but I know how nicely he can heel so I would like to be able to show that off in the ring. An exercise that I found has really helped with that is one that a different training friend of mine showed me years ago (Thanks Ferne!). While in an off-leash heel, whenever Romeo is nice and close and making eye-contact, I click and toss a treat out to the side. I keep walking and as soon as Romeo catches back up to me and makes eye-contact, I click and toss another treat. So he is doing a lot of running away from me and back again as I keep up a random heel pattern around the room. This really seems to work in reminding him that if he ever ends up out of heel position, he should run to catch back up again so that he can make eye-contact. We will keep playing with this over the next week and hopefully it will transfer over to the ring. Though this time Romeo is only in Rally-O (he got his CD this spring and is not ready for Open obedience yet) so I have a bit more leeway in encouraging him to keep up.
I wasn't able to take any pictures this time around, so I will just share some Rally-O pictures from past trials. These are from a CKC rally fun match held in North Battleford, summer of 2007. Nice heeling, boys!

 (Wow, I never realized how much coat Romeo has grown in the past year! He looks so scrawny there!)
Subscribe to:
Comments (Atom)